Cvent's Site Designer allows you to customize your website and registration that's capable of displaying on a responsive page. Adding headers, placing your register buttons, customizing the theme, building a layout, using widgets, incorporating motion and animation are important to building out your webpages. Reference this article for a list of common Site Designer terms.
NOTE: If you're unable to access the sections below, ask your Administrator to adjust your user role permissions under > Admin > Manage Users > User Roles > Select the user role > Event > Website & Registration Permissions
Adding a Header
1 Access the Site Designer. Begin by selecting your event. From the Event navigation, hover over Registration, then click Registration Process. For the website, click Event Website from the Event navigation.
Click Open Site Designer.
NOTE: Need to edit both the website and registration? Once you access the Site Designer, you can easily switch pages by selecting a page name from the Website Page or Registration Page dropdown in the top left of the designer.
2 Add a header. In the top left of the canvas, click the Registration Page or Website Page dropdown, scroll down to the Header and Footer section, and click Default Header and Footer.
On the canvas, click the section header you want to add an image to. To the right of the canvas, hover over Background Image, and click Replace. Open a folder from the Media Library, then select an image. Ensure Scale to Fit and Horizontal Repeat are selected to keep the image's proportions
NOTE: Avoid using background images with static text directly on them. Instead, select a design-only image and use widgets to add your text on top.
Need to space things out? Click the Website Navigation widget. Click Customize, then Widget. Scroll down to the Spacing section and use the sliders. Alternatively, if you’ve added an Image widget to the header, you can add space to that by clicking the widget. Click Customize, then Widget. Scroll down to the Spacing section and use the sliders.
When you're finished, click Save to preserve the draft, or click Publish to make the changes visible to invitees. Then click Back to full site to return to the main view.
3 Determine which pages the default header and footer apply to. Click the Registration Page or Website Page dropdown in the top-left of the designer. Scroll down to Default Header and Footer, and click on  to open the settings.
Here, you can rename the title of the page and determine if you want to apply the default header and footer to newly created pages.
By default, the header and footer will apply to all website, registration, and My Registration pages. If you do not want the header to apply to a specific page, uncheck the box to the left of its name.
Then click Apply.
When you're finished, click Save to preserve the draft, or click Publish to make the changes visible to invitees.
NOTE: After five seconds of inactivity, any edits made in the Site Designer are automatically saved as a draft. The draft will not be considered the final version until you click Save or Publish.
Placing Your "Register" Buttons
1 Access the Site Designer. Your "Register Now" button is already added to your website's header by default (however, you can move it if you would like), but we also suggest adding the "Already Registered" button there as well to ensure your invitees can just as easily review their registration.
Begin by selecting your event. From the Event navigation, click Event Website. To the right of the Summary, click Customize.
2 Add the Already Registered button to the header. From the Website Page dropdown in the top left of the designer, scroll down to the Header and Footer section, and click the header you want to add the button to. To the right of the canvas, scroll down to the Confirmation Options section, and drag and drop the Register Now Button widget onto the canvas. Toggle "Display Already Registered link" to blue. Edit the text, if necessary.
When you're finished, click Save to preserve the draft, or click Publish to make the changes visible to invitees.
Customize the Website's Theme
1 Access the Global Theme section of the Site Designer. Instead of individually editing each widget to create a cohesive website, customizing the global theme section of the Site Designer will allow the changes to be applied across your whole website.
Begin by selecting your event. From the Event navigation, hover over Registration, then click Registration Process. For the website, click Event Website from the Event navigation. Then click Open Site Designer.
Click Theme to the right of the canvas.
2 Select a theme. Click Change Theme to determine the basic design of your pages.
NOTE: The available themes' colors and fonts can be customized, but they currently align with WCAG for 508 compliance.
To return back, click the  icon.
icon.
3 Customize the colors, if necessary. To customize the theme colors, in the Theme Styling section, click Colors. The first three make up your background colors, while the last two are your text. Notice that the first three contrast with the last two. This has to do with being 508 compliant and aligning with WCAG. If changing the colors to match some of your branding, it's best to pick similar colors, keeping the background light and the text dark, or vise versa.
To change the color, click the textbox and enter a HEX value, or select a color from the color picker.
To return back, click the icon.
4 Set the dimensions. In the Theme Styling section, click Dimensions.
The website layout width stretches your sections to fit the length of the screen. We recommend that you check Fit to Entire Screen.
The website content width determines the width of your widgets within the sections. It is recommended that you do not check Fit Content to Full Width, as this can stretch your widgets out. Instead, we suggest setting the "Max." to 1024 to ensure your images fill the screen without stretching it.
To return back, click the icon.
5 Customize the text styling options. Click one of the components from the Text Styling section. Here you can choose how the text, background image, background, border, and spacing display.
When you're finished, click Save to preserve the draft, or click Publish to make the changes visible to invitees.
Building a Layout
1 Access the Site Designer. Begin by selecting your event. To go to your website, click Event Website from the Event navigation. Then click Open Site Designer.
2 Add your sections. Layouts are organized by sections, which contain pre-built layouts for specific content types, like FAQ pages or venue spotlights. To the right of the canvas, click Sections. From the dropdown at the top, select a category to browse through the different pre-built sections. Then, drag and drop the section you want to use onto the canvas.
Then repeat these steps to add more sections or continue customizing the individual widgets, if desired.
When you're finished, click Save to preserve the draft, or click Publish to make the changes visible to invitees.
Or, create custom sections. Custom sections allow you to save a section that you've previously built and reuse it across multiple events in your account to maintain consistency and reduce build time.
On the canvas, hover over the section you want to save, then hover over the section actions toolbar that appears on the left. Click the  icon, then enter a unique name for the section and click Save.
NOTE: Saved custom sections will automatically inherit the current event theme across events in your account while preserving the widget-level customizations configured in the original section. Sections saved under the legacy theming experience won’t appear in the new theming experience, and vice versa.
When you're finished, click Save to preserve the draft, or click Publish to make the changes visible to invitees.
Adding and Customizing Widgets
1 Access the Site Designer. Begin by selecting your event. From the Event navigation, hover over Registration, then click Registration Process. If necessary, select your registration path from the Registration Paths dropdown. To the right of the page you want to edit, click Customize.
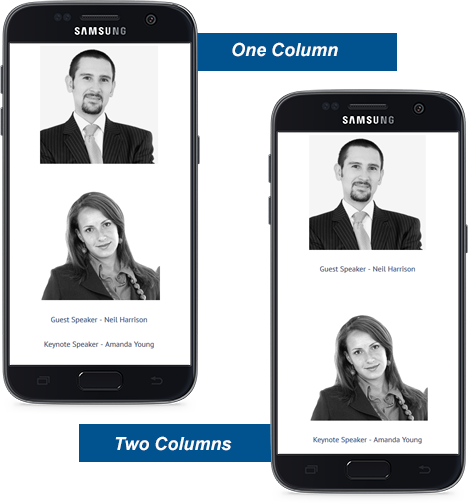
2 Add your structure. Your webpages are a mix of sections and widgets. They work together to establish how your content will display depending on the size of the device that the website is being viewed on. For instance, if you're displaying a row of your speakers with their names underneath, the section's column set up will determine how the content displays. While there will be very little difference when viewed on a large desktop, the display can shift dramatically when viewed on a mobile device. Reference the image below to view the differences.
To determine how many columns your section has, scroll down to the Structure & Organization section to right of the canvas. Drag and drop the Section widget onto your canvas. The Section Editor will appear to the right of the canvas. Scroll down to the Section Layout section, and click the number of columns you would like. If you select two or three columns, click and drag the  to determine the percentage of which each column should occupy the section. In the example below, the section is broken into 3 columns, where event title widget takes up 50% of the section, and the date and location widgets each take up 25%.
NOTE: Some widgets cannot be placed into columns, as the widget itself takes up too much space. These include the progress bar, countdown timer, location map, and website navigation widgets.
Similar to sections, Container widgets can be used to hold multiple content widgets, which allows you to easily move or duplicate a group of widgets. To add a Container widget, to the right of the canvas, scroll down to the Structure & Organization section. Drag and drop the Container widget onto your canvas.
3 Add content widgets. Now it's time to add content to your section. Drag and drop a widget onto the canvas.
Use the section to the right of the canvas to make any updates to the widget.
NOTE: If adding a new line of text in a text box field, you will need to hold down the Shift and Enter buttons on your keyboard at the same time to ensure single-line spacing. Pressing Enter only will add additional spacing.
4 Include spacers, if necessary. Spacers determine how much of your image displays, or increases a section size. Since spacers stay static on your webpage, it's best to use smaller spacers, even if you need to use multiple spacers, rather than large spacers.
To add one, scroll down to the Structure & Organization section to the right of the canvas, and drag and drop the spacer where you want it to appear. Click Customize under the Styling Options to the right, then click Widget, and make your changes. You can adjust different settings such as the color, opacity level, corners, borders, and height and width of the spacer.
NOTE: An additional tip when building out your widgets is to reference the breadcrumbs in the very bottom-left of your canvas, which let you know where you are editing. To reset your widget, click Customize in your widget's Styling Options section, and click Reset Widget Styles.
When you're finished, click Save to preserve the draft, or click Publish to make the changes visible to invitees.
Incorporating Motion into Your Website
1 Access the site designer. Begin by selecting your event. From the Event navigation, hover over Registration, then click Registration Process. For the website, click Event Website from the Event navigation.
Click Open Site Designer.
NOTE: Need to edit both the website and registration? Once you access the Site Designer, you can easily switch pages by selecting a page name from the Registration Page dropdown in the top left of the designer.
2 Add a GIF. To the right of the canvas,drag and drop the Image widget onto the canvas, or click into a widget or section on your canvas that you want to add a GIF to. In the configuration options to the right of the canvas, click Add Image or Replace if an image has already been added. Open a folder from the Media Library, then select the GIF. If adding a new GIF, click the  icon then, click Upload or drop file to browse for the image on your computer, or drag and drop the GIF into the Upload box.
Select the folder you want to add the GIF to or click Create Folder to create a new one, give it a name, then click the  icon to save.
Click Upload to folder, then Close. Click on the GIF to add it to the canvas.
Establish the GIF's styling and configuration options.
When you're finished, click Save to preserve the draft, or click Publish to make the changes visible to invitees.
3 Add anchor links. Anchor links allow you to navigate to a different area of the same event website page. To add an anchor link, to the right of the canvas, drag and drop the Anchor link widget on the canvas. In the Configurations Options to the right of the canvas, customize the Anchor Name. This name will appear as a hyperlink on your event website.
Next, select the widget you want to link to from the dropdown.
When attendees click the anchor link, they will navigate directly to the widget you selected.
When you're finished, click Save to preserve the draft, or click Publish to make the changes visible to invitees.
Incorporating Animation into Your Website
1 Access the site designer. Begin by selecting your event. From the Event navigation, hover over Registration, then click Registration Process. For the website, click Event Website from the Event navigation.
Click Open Site Designer.
NOTE: Need to edit both the website and registration? Once you access the Site Designer, you can easily switch pages by selecting a page name from the Registration Page dropdown in the top left of the designer.
2 Add an animation to a widget. You can add built-in animation effects to Image, Text, and Custom Link widgets to control how they appear and respond to attendee interactions on your event site. To add animations to a widget, to the right of the canvas, drag and drop the supported widget onto the canvas.
NOTE: Custom Link widget can be added only to website pages in the Site Designer.
Additional options will appear to the right. In the Styling Options section, click Animate.
3 Select a trigger. The Animate section will display four triggers: Page Load, Hover, View, and Click. Triggers determine when the animation plays on the widget. Click the trigger you want to use, then select the animation action.
NOTE: Multiple triggers can be configured per widget. One animation action can be configured per trigger.
4 Adjust and Preview the animation settings. In the Adjust Animation section, update the animation settings, if needed.
When you're finished, click Save to preserve the draft, or click Publish to make these changes visible to invitees.
NOTE: Worried about losing your progress? If the Site Designer is closed manually or due to inactivity, a pop-up will appear. Click Keep Edits to continue from the last auto-saved draft or Open Last Saved to load the last manually saved version.