Respond to an RFP by following the steps below. You can cut response time by setting up defaults for your introduction, estimated costs, taxes, and additional information fields so they'll populate automatically for each new proposal.
1 Review the RFP details. Begin by hovering over the global navigation, then hover over RFPs and click Manage RFPs. Locate the RFP you want to respond to.
If your organization has purchased a Group Pipeline Intel (GPI) or Cvent One bundle, click the  icon to the right of the RFP name. The RFP Insights popup will give you an overview of key event requirements, useful planner insights, and additional data to help you identify the quality of the lead.
Otherwise, click the name of the RFP and review its details by using the tabs at the top, such as General Information, Contact Information, Event Details, or Event Requirements.
2 Create a proposal. Once you've reviewed the RFP details, click Create Proposal.
| NOTE: If you have access to Response Automation, and if the RFP was successfully scored, the Proposal Assistant will save you time on entering rates, dates, and meeting space. Access it by hovering over the global navigation, then hover over RFPs and click Open Response Automation. |
Scroll down to the Proposal Details section and add a brief introduction. Include specifics about what sets your venue apart here, but avoid fluff. There will be plenty of places to elaborate later.
Select the currency you want from the dropdown.
At the top of the Commission Details section, you can view whether the planner requested commission on any proposal sections.
Select whether this is a commissionable bid. If it is, click Add to enter the commission rate you are willing to pay and the proposal section it can be applied to. If you want to offer commission rates on multiple sections of the proposal, create separate entries for each section in turn.
Your proposed commission rates do not need to match the ones requested by the planner.
| NOTE: Does your venue offer default commission rates to third-party planners? Have them added to the proposal defaults so they are pre-populated in all new commissionable bids. |
Under Event Availability, click Select next to the dates provided by the planner, that you can accommodate. Then, specify how fully you'll be able to accommodate these dates using the Event Availability dropdown.
Your options include:
- 1st Option - You have space available and can meet their needs. When you select this option, you'll need to specify if you'll be holding the space for this event and for how long.
- 2nd Option - Another group has requested this space, but if that falls through, the planner's next on the list.
- Available with Limitations - You can meet most of the requirements for these dates, but not all. Use the Additional Information box to explain.
If these dates just don't work, you can propose new dates by clicking the Add Date Option button. You can only add up to 11 alternative dates.
Take advantage of the Additional Information box to add notes or selling points.
Click Next.
3 If applicable, include sleeping rooms and rates, alternate dates, and taxes. Review the housing requirements for this group.
| NOTE: If the planner is not requesting sleeping rooms, you won't see this section at all, so skip to the next step. |
If you want to offer meeting packages, select Yes next to "The planner asked for meeting package pricing. Do you want to add that instead of itemized pricing?"
Specify if the guest room and meeting package rates include tax and if the guest room rates include breakfast costs.
| NOTE: Keep in mind that the last two questions are simply informative, to help planners correctly calculate their budgets. |
If you see a "Guest Rooms Offered on Peak" field, enter the maximum number of sleeping rooms you can offer at one time and click Apply. In the next prompt, check the boxes next to the room types you can offer and click Apply.
In the Guest Rooms grid, enter your sleeping room availability and rates.
| NOTE: When you add a 24-Hour Rate, All Inclusive, or Complete Meeting Package in the Meeting Packages section, you no longer need to enter itemized room rates in the Guest Rooms grid. |

If you have access to Response Automation, you can click View more room rates to see competitive data that can help you determine what rates to offer in your bid.
Save yourself some typing by entering the rates in the first row only. Then click Copy Day, check the boxes next to the remaining dates in the dropdown, and click Copy. The rest of the fields will now match the first row. To add a note, click the  icon at the end of a row.
You may see the option to include rebate information. If so, click Yes and enter your rebate in the field that appears. Specify whether it's an amount or percentage using the dropdown. If your rates are confirmed, you can list your confirmation contingencies in the appropriate box. If they’re not confirmed, click No and enter your maximum yearly increase for sleeping room rates in the box.
If the planner added alternate dates for this event, indicate your availability using the radio buttons.
For additional dates, click the ranges and include your rates. You can even copy the date range if you only need to make small tweaks from the previous date range's rates.
Scroll down to the Additional Fees section to include taxes. Select the tax category from the dropdown, then enter its amount or percentage and select its corresponding calculation method. In the "Applicable To" column, use the dropdown menu to select which section of your proposal the tax is meant for. This way you can set specific taxes that are applicable only to meeting packages, guest rooms, or food and beverage.
| NOTE: Remember that the taxes entered here are simply informative, to help planners manage their own calculations. |
Click Add Tax, if you need to set up more than three tax categories. Save time in the future by setting up default taxes, which are added automatically to each new proposal. Click Next, or, if the RFP doesn't include meeting requirements, review and, if necessary, estimate your costs.
4 If applicable, include meeting space and rates. Review the planner's meeting space requirements. Don't have the necessary function space available? Enter a message in the Additional Information field to let the planner know, then skip to the next step.
If you can meet the requirements, click Add Meeting Room next to the desired agenda item. Or, if your venue is a conference or convention center, click Add Event Space. Fill out the required fields in the popup window. You can apply this same room to multiple agenda items by checking the boxes at the bottom.
| NOTE: Manage your meeting rooms in another software program? Click Import Meeting Rooms to download a spreadsheet, add room details, and import them all at once. |
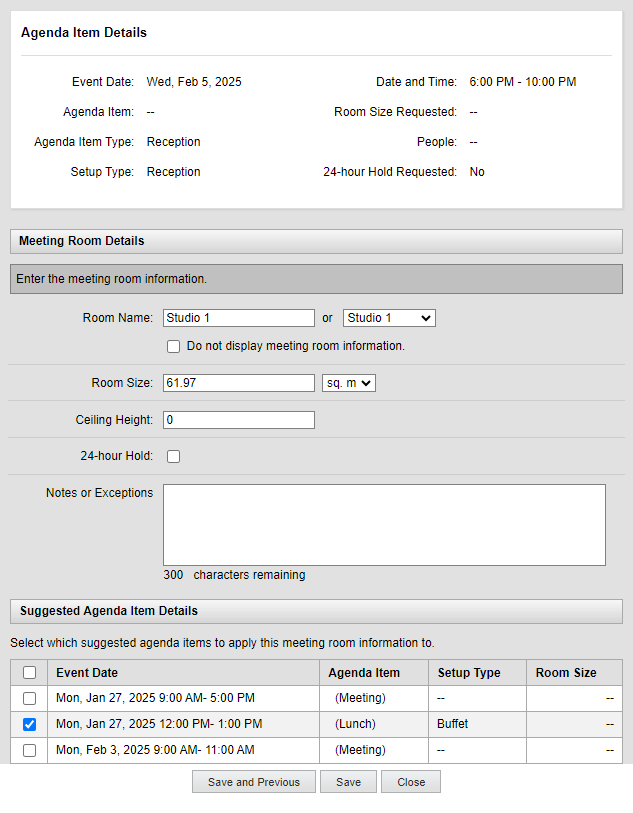
Click Save.
Consider including additional information and addressing audio/visual needs in the appropriate boxes.
5 Estimate your costs. Scroll down to Your Estimated Costs. The items in red are those the planner has required. You must fill them out or select Complimentary, N/A, or Waived from the Cost Type dropdown to continue. Any other costs listed are optional.
To include one that's not listed, click Add Item. You can add notes by clicking  at the end of a row. Check the box next to the item and click Save As Default to automatically add this cost to all future proposals.
Click Next.
6 Answer the planner’s questions. Since the Additional Questions are created by the planner, be as thorough as possible. Avoid responses like "N/A" or "see above."
| NOTE: If Response Assistant was enabled for your account, you can use it to automatically generate answers and speed up the proposal workflow. |
Answered a question before? Click Previous Responses to view and select what you or another user has already written.
If you're answering a new question and want to reuse your answer next time you're asked the same question, click Save as Future Proposal Default once you've typed your text.
Click Next.
7 Add additional details and attach documents. Respond to the planner's concessions, billing requirements, or contractual requirements in the box.
To attach a document, scroll down to the Attachments section and click Add from Library to attach a file saved in Cvent, Upload from Computer to locate one on your hard drive or network, or Add URL to link to a file online.
"Sign" your proposal by filling out the Proposal Key Contact Information.
Click Next.
8 Submit the proposal. If your venue has purchased smart custom proposals and one or more templates were associated with it, you can select the proposal template you want from the dropdown. Once a template has been selected, you can see what the proposal will look like to planners by clicking Preview Proposal. If you want to make any changes, click Edit template.
Want to send a copy of the proposal to yourself or someone else? Click Add Recipient and enter an email address in the field that appears.
Consider adding a closing message. This will be included in the email notification planners receive. Check the boxes next to CVBs copied on the RFP if you want them to view your proposal and know you've responded.
Finally, click Submit Now to send your proposal or Review and Submit Later to save it for when you're ready.